Accessibility is a term that has different meanings in different contexts. For video, a video can ensure the subject is easier to understand and removing barriers to learning, therefore making it more accessible. This is often defined as Universal Design for Learning or UDL. Accessibility can also refer to the inclusive practice of ensuring there are no barriers that prevent interaction with, or access to information for people with disabilities. The Accessible Canada Act (ACA) defines disability as:
“any impairment, including a physical, mental, intellectual, cognitive, learning, communication or sensory impairment – or a functional limitation – whether permanent, temporary or episodic in nature, or evident or not, that, in interaction with a barrier, hinders a person’s full and equal participation in society.” (Source)
In this section we will explore the requirements to ensure your video complies with Accessibility for Ontarians with Disabilities Act (AODA) – specifically the section that describes information and communication standards.
Captioning
Captions are text (often shown as white text in a black box) that are the words being narrated in the video. They can be added in real-time by a human captioner or through automated speech recognition technology. They can also be added to pre-recorded videos when sharing via a video platform (YouTube, Vimeo or MacVideo, etc.) Captioning videos improves access for students who are D/deaf, hard-of-hearing, or experience cognitive or learning disabilities. They may also be used by students who do not identify as having a disability but for whom English is not a first language, or viewing the video in a loud environment, or prefer to read and listen instead of just listen.

Automated Captions
Whether your video is created using a script or an ad-libbed voiceover, machine automated captioning can be an easy and efficient way to create captions. Automated captioning is built-in to several McMaster institutionally supported video creation tools, such as MacVideo and Echo360. When you upload a video to these platforms the captioning is processed in the background and is embedded when people view the video. Users can choose whether they want to display the captions or not.
Automated captions can have a high accuracy rate, ~85% correct – but even a small error can change the meaning of a sentence quite drastically. It is important to verify and make any corrections when using automated captions. MacVideo allows you to easily make changes to their captions, as well as output them to an SRT file which can be used with other video platforms provide the text to create a transcript which should also be available for download.
Colour Contrast
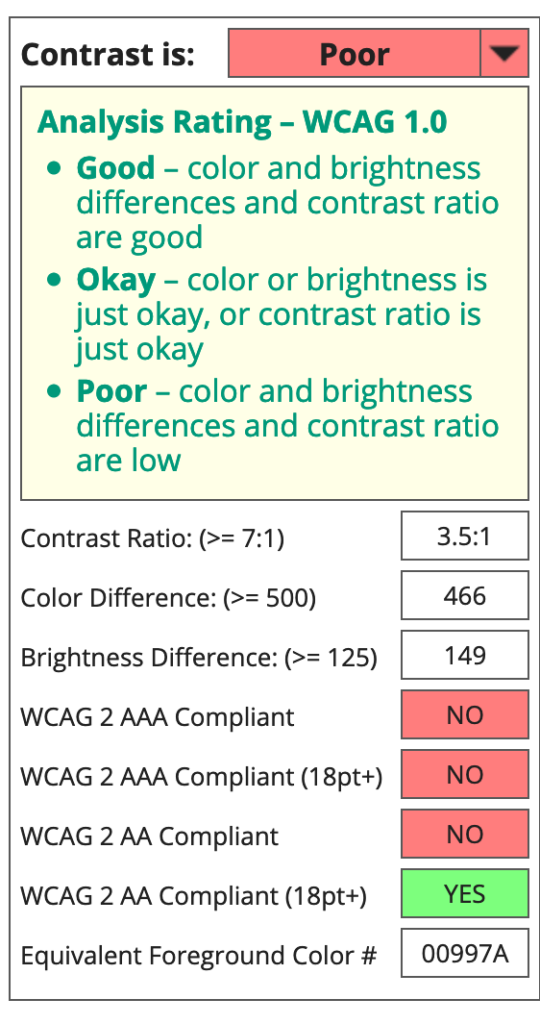
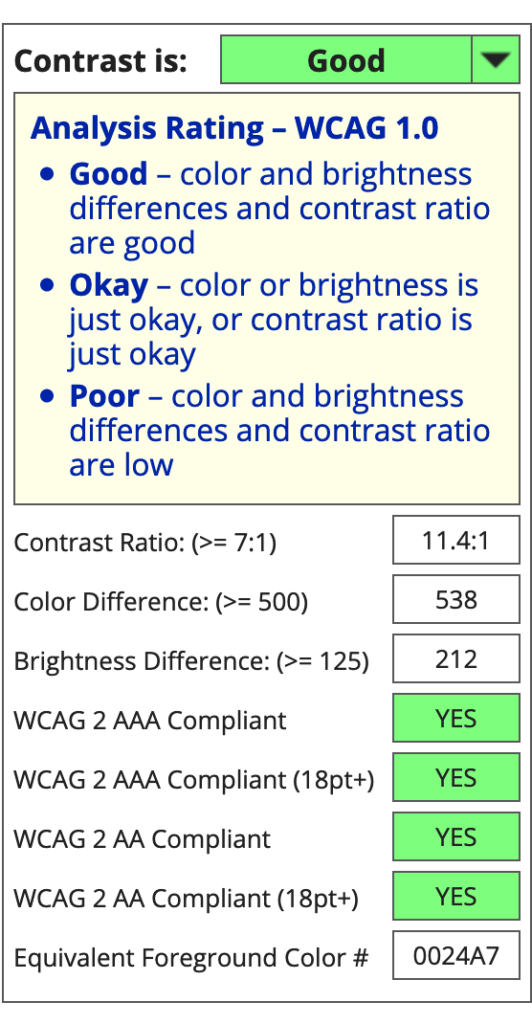
The effective use of colour in your video can draw your learners’ attention, emphasize key points and add aesthetic interest to your video. However, your choice of colours should be considered with accessibility in mind. The web accessibility guidelines instruct us to avoid relying on colour to convey meaning. Another critical component is colour contrast. By using low contrast colour combinations, it can create a barrier for some people. Colour contrast compares the brightest colour to the darkest colour in an image and expressed in a ratio, where a high ratio indicates a higher contrast.
To verify that the foreground text and background colour of your presentation slides have adequate contrast, try using a colour contrast checker or You can enter the RBG or HEX values for the colour and verify whether they meet requirements. Examples:
Colour Blindness
Another consideration is colour blindness, which affects 5-10% of the population in its various forms. Red-green deficiencies are the most common, so avoid using this combination in any non-decorative content. Blue-yellow deficiency is also common.

Describing Video
The visual imagery of video carries a lot of information but is not, unfortunately, accessible to all. While you don’t have to narrate everything that’s happening on the screen, you should at least:
- describe any images that are meant to convey content (i.e. those that are not decorative),
- reference aloud any important information that is on the slide or in the presentation.
If you catch yourself saying “as you can see from the slide…,” then it’s probably something that you’ll need to describe for students who are blind or have low vision.
Figures, videos, animations – consider how you will represent them in the video’s script if they are important to your students’ learning.