Video usage grew 24% in 2022, now equating to 65% of all internet traffic. (Source)
Video is increasingly a part of our everyday lives, both in and out of the classroom. Understanding three basic components and using simple tools and techniques we can quickly learn how to create great videos for an engaging learning experience. Creating great videos is easy if we have a good understanding of three basic principles:
- Light
- Quality
- Editing
While you may have reservations about creating videos in your class, understanding these three components will allow you to create great videos quickly and easily.
1) Light
The amount of light, or absence of it, greatly impacts your video. Just like our eyes, the camera needs light to see, or record, the image. But the camera needs more light to create a quality image that replicates what our eyes can see. This section explains how to use light effectively to get great results when making video.
Light is easily one of the most important factors for creating great video. While this could be a course unto itself, for our purpose we need to know that we need as much light as possible. There are a number of ways you can increase the light available for your camera – you can record outside and use daylight, position yourself near a window, or add an external light source – like a lamp or spotlight.
In this image, you see a comparison of how the computer camera and an external webcam interpret light. The images on the bottom have an external light source that greatly improve the quality of the image.
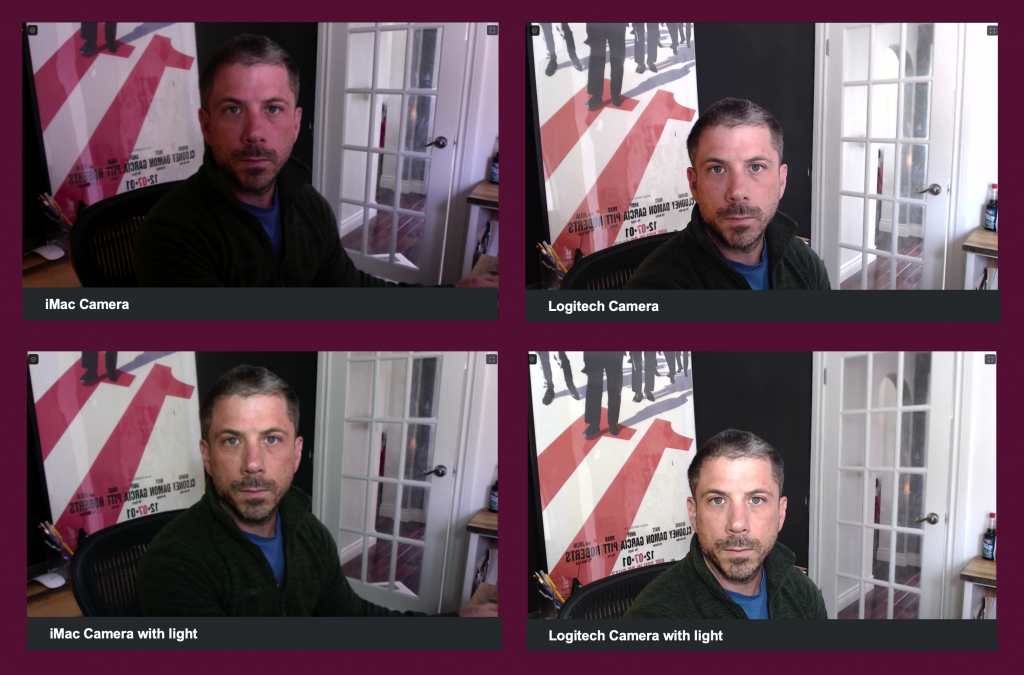
Take note of how the light hits the facial features and the resulting effect on clarity. You don’t want the light to be too harsh. You also want to avoid light on either side of the face. This creates shadows and an unflattering effects. Place the light directly in front of your face for best results. Or, face the window to take advantage of flattering, soft light.
Pro tip: While most built-in cameras are great, adding an external webcam or DSLR can greatly increase the quality of your videos. The camera used above is the Logitech 922 ProStream.
Everyone has taken a picture that is too dark or bright – that is exposure – how much light is used by the camera to translate the image. Not enough light and the image/video is dark. Too much and it is too bright. You can control exposure in a few ways.
- Control the distance to the camera. Too bright? Move the camera away from the light source and vice versa.
- Add a Filter. You can filter the amount of light by putting something between the camera and the lights source. This can be as easy as a piece of paper over a light to help diffuse the amount of light.
- Use exposure lock. Most phones give you the ability to “lock” the exposure. This stops the camera from trying to measure the amount of light at a default setting that you choose.
Adding funky filters for cool effects can be awesome on social media. But for professional purposes we want our videos to be high quality. And we want to look our best! Adding lots of light and making sure it is soft will get us most of the way there. But one other factor is that light has colour. As you can see in the image below, light ranges from warm yellow/orange to a cool blue.
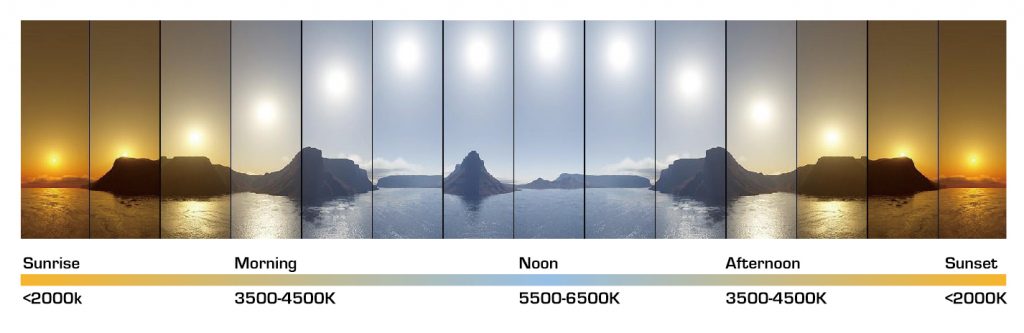
Typically, indoors we want to replicate the daylight spectrum for best effects and avoid our faces or room looking orange. You can accomplish this by using lightbulbs with a Kalvin rating of 4-5000K. This will give you great results. Avoid fluorescent bulbs if you can – they tend to flicker and the camera may pick this up and cause a distracting strobe effect.
2) Quality
Quality is a tricky word. Everyone has a different idea of what quality is. You can spend may hours perfecting your videos to make them great. You can get fancy with amazing effects and animations. While those things may increase engagement, they do require a time investment. When we are creating video for learning we want to have the basics be great quality so they are not distracting from the learning experience. To achieve this, we create video with four components: great audio, great lighting, great composition and great technique.
Many people consider video quality in connection to technical specifications. When you use a phone or computer camera the machine does most of the work. This module gives you ways to improve that quality without having to worry or think about the technical aspect. In this section quality is not connected to effectiveness.
As we learned earlier in this module, great audio is a key component. Following the tips and principles that our audio should avoid background noise, be free from distraction, clear and loud, capture attention and avoid errors. If required, review the module on how to create great audio.
Great Composition
Composition refers to how we arrange, or frame, the image in the camera. You get to play director here! There are some basic rules we can follow that will greatly improve the quality of our videos.
Follow the Rule of Thirds
The rule of thirds is a concept that is used in art, film and photography that drastically impacts how your image/video is received. As you can see in the image below, the image is divided into thirds horizontally and vertically. Placing the subject (yourself) dead centre creates tension for the viewer. As you can see below, the subject is off to one side, we follow the gaze and angle of the arm and leg. And the space to the right is great for additional text!
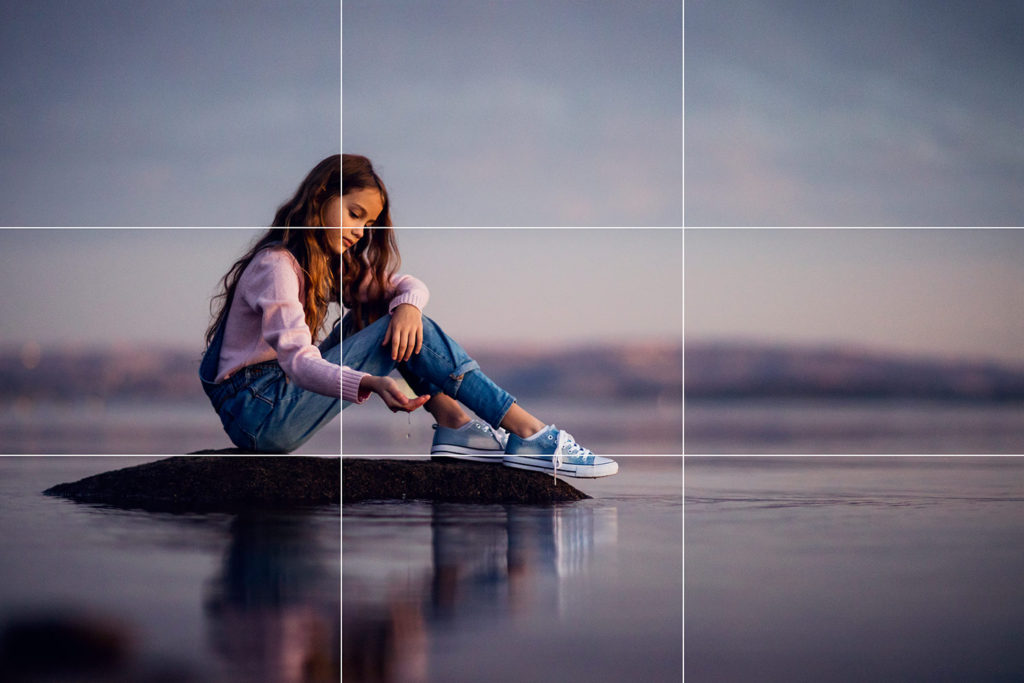
If you dig through your setting on your phone there is an option to turn this grid on/off. Use the rule of thirds to your advantage.
Framing
Where you place yourself/subject on the grid in rule of thirds will improve the quality of your video. How much of the frame also impacts the experience. You want to avoid being too large in the frame. Too close is too personal and the viewer will pay closer attention to your facial features instead of the message.

This image illustrates this concept and provides a good solution – but you can see how being centred causes your eye to wander around the frame – and there is no extra space for complimentary text or graphics.

Good Technique
Use a tripod
A shaky video is immediately distracting. And hard to watch. Unless you are making a horror film, we want the camera to be still. Let the subject be the movement. To achieve this – use a tripod. You can usually purchase a tripod for your phone for a few dollars. Or prop the phone up so it is still – then hit record.
Simplify the background
If you can, you want to control the background of your video. You want the background to complement your message. You also want the background to be simple and, like audio, avoid distractions. Things like books or interesting objects will pique interest and distract from learning. If they can, learners will try and read what is in the background. Also try to avoid personal items or settings.
If you can, get some distance from the camera and the background. This will somewhat blur the background and keep the focus on you – or the subject – which is what we want learners to do.
Look into the camera
It seems weird at first, but if you can, stare directly at the camera. As viewers we naturally follow the path of the eyes. We try to make a connection with the presenter. When you stare directly into the camera it is like you are looking someone in the eyes. You are speaking directly to them. If it helps, try to think about a specific person while you are recording – say a friend, parent, colleague… If your are speaking directly to them it will be reflected in the video and be more personal.
3) Editing
They say editing is where the magic happens. Much of the time you may be able to create a great video without needing to edit it. However, sometimes you may need to remove mistakes, background noise, or add embellishments. For our purposes we will focus on simple editing techniques that will allow you to remove mistakes, decrease/increase the volume, and add images. With a little exploration you can discover many more tips and tricks to make great videos.
This section uses Camtasia to illustrate the required techniques but the principles are similar for many video editing tools. Camtasia is a supported tool that is easy to use for recording audio and video but you should use the tools that work for you. You can view the selection of tutorial videos on the Techsmith Website.
Pro tip: Creating video can be taxing on the computer system. Make sure you have enough room on your hard drive and memory for it to work well. These are the requirements for using Camtasia.
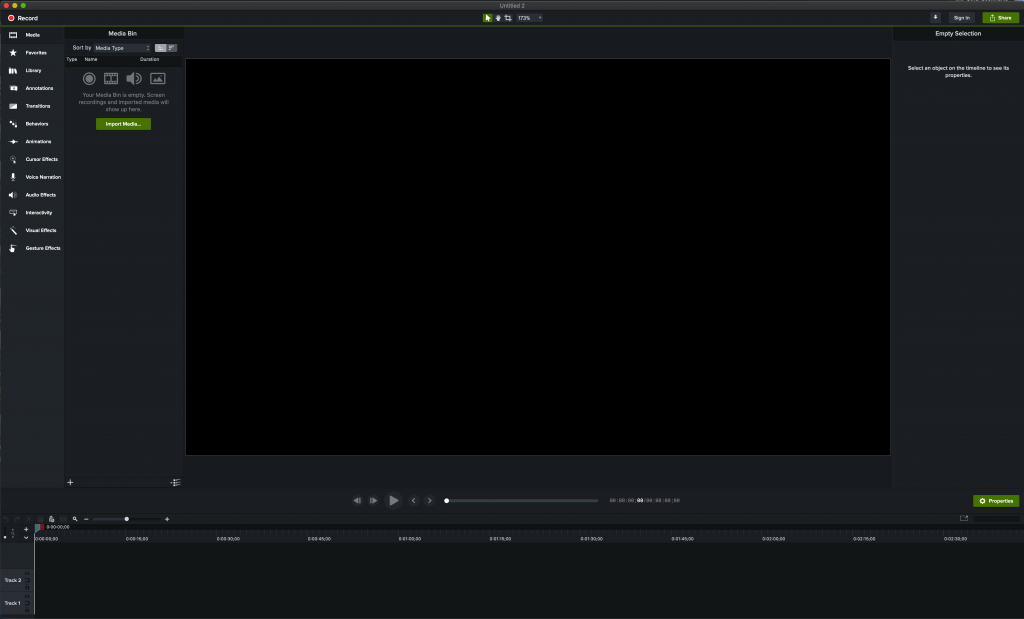
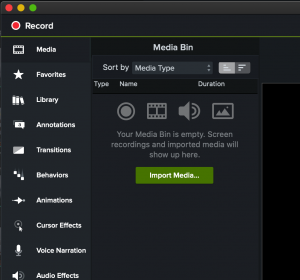
If you made your video/audio recording on your phone/tablet it may easiest to edit on the same device. But if you would rather work on a computer the first step is to import it into Camtasia. The process is the same if you are doing audio only.
- To import your media, click the green Import media button.
- Then locate your media.
- Camtasia will put the files in your “bin” and put them on the timeline. The timeline is where you will edit the video.
Once you have imported your media you can begin the editing process. The most common edit is to delete a section of the video to remove a mistake. The following video illustrates the common edits used to remove content.
Editing Audio:
Even if you follow the information presented in Creating great audio, sometimes you will have to edit it. You can take out dead air, fix mistakes, increase the volume, etc. This video shows you the basics of editing audio.
Exporting Media:
Once you have all of the editing completed you will be ready to export your media and share with students. To do this, follow the steps outlined in this video:
Share your media:
Once you have exported your video you can then publish your file to be shared with students. You have many options to choose from including MacVideo, Echo360, Microsoft Stream and others. We recommend MacVideo for this type of video which easily embeds in Avenue courses like this one. MacVideo also does automatic captions.