Welcome
Using video in your teaching offers an engaging means to convey course content, adds variety to your instruction and – when teaching online – is a powerful way to bring your presence into the course.
The aim of Video Made Easy is to demonstrate that you can make video that looks and sounds great with the equipment you already have available to you or can easily obtain.
As a different format from a more traditional lecture, creating videos for teaching offers an opportunity for us to rethink how we communicate course content to our learners. Certainly, most of us would likely have trouble sitting through a three-hour lecture delivered over video (and, well, sometimes in person).
Below are some general practices to keep in mind when you are planning out your videos. If you’d like to go into greater depth, Vanderbilt University has developed a succinct guide to the elements of an effective educational video.
Break video content into smaller chunks
Turning a three-hour lecture into a series of 10-15 minutes videos isn’t about omitting content but rather, being more concise in communicating it – which is easier to do when you’ve planned out and scripted your video. Determine logical breaks within your content, and book-end your videos with an introduction to and summary of what you’ve discussed to help reinforce student learning.
Focus on one or two learning objectives per video
One of the ways to break up your video content into smaller chunks is to focus on only one or two learning objectives at a time, and to ensure that what you cover in the video is related to those learning objectives. Keeping your learning objectives at the heart of your video will be helpful.
Make it participatory
If you incorporate activities for students in your classroom teaching to keep them engaged, translating that experience to a video lecture environment is an appreciable challenge. However, it is still possible to bring a participatory quality to video.
Address the viewer directly and build in activities that they can do on their own. Ask them to reflect on their experiences or consider whether they agree with an argument. Remember that they are likely to be viewing your video on a computer and phone – are there online resources relevant to the video that you can direct them to? Some tools, like MacVideo, allow you incorporate questions as another way to encourage participation.
Before you start making a video
Although using video in your teaching can be rewarding, there are also times when it’s not the best modality for the content or intended learning outcome associated with it. Perhaps learners have unreliable or low-bandwidth connections, and watching or downloading videos may be frustrating for them. There are a number of great reasons to create videos, but it’s also important to consider if video is the right tool for the learning task.
Pro:
- Great for explain/demonstrating and storytelling
- Short videos can increase retention/comprehension
- Can be interactive
- Appeals to a variety of learning styles
Con:
- Long videos can be counter productive
- Can be boring
- Updating may require more work than updating text based resources
If you’re unsure about whether a video is the right tool, request a consultation to explore your options.
Learning Outcomes
By the end of this workshop, you should be able to:
- Apply accessible design principles to improve the accessibility of your videos
- Avoid copyright infringement when bringing images and other content into your video
- Record high quality audio for your video using a minimally equipped home studio
- Create videos for teaching with the tools and software you have available to you
Video and Accessibility
Accessibility is a term that has different meanings in different contexts. For video, a video can ensure the subject is easier to understand and removing barriers to learning, therefore making it more accessible. This is often defined as Universal Design for Learning or UDL. Accessibility can also refer to the inclusive practice of ensuring there are no barriers that prevent interaction with, or access to information for people with disabilities. The Accessible Canada Act (ACA) defines disability as:
“any impairment, including a physical, mental, intellectual, cognitive, learning, communication or sensory impairment – or a functional limitation – whether permanent, temporary or episodic in nature, or evident or not, that, in interaction with a barrier, hinders a person’s full and equal participation in society.” (Source)
In this section we will explore the requirements to ensure your video complies with Accessibility for Ontarians with Disabilities Act (AODA) – specifically the section that describes information and communication standards.
Captioning
Captions are text (often shown as white text in a black box) that are the words being narrated in the video. They can be added in real-time by a human captioner or through automated speech recognition technology. They can also be added to pre-recorded videos when sharing via a video platform (YouTube, Vimeo or MacVideo, etc.) Captioning videos improves access for students who are D/deaf, hard-of-hearing, or experience cognitive or learning disabilities. They may also be used by students who do not identify as having a disability but for whom English is not a first language, or viewing the video in a loud environment, or prefer to read and listen instead of just listen.

Automated Captions
Whether your video is created using a script or an ad-libbed voiceover, machine automated captioning can be an easy and efficient way to create captions. Automated captioning is built-in to several McMaster institutionally supported video creation tools, such as MacVideo and Echo360. When you upload a video to these platforms the captioning is processed in the background and is embedded when people view the video. Users can choose whether they want to display the captions or not.
Automated captions can have a high accuracy rate, ~85% correct – but even a small error can change the meaning of a sentence quite drastically. It is important to verify and make any corrections when using automated captions. MacVideo allows you to easily make changes to their captions, as well as output them to an SRT file which can be used with other video platforms provide the text to create a transcript which should also be available for download.
Colour Contrast
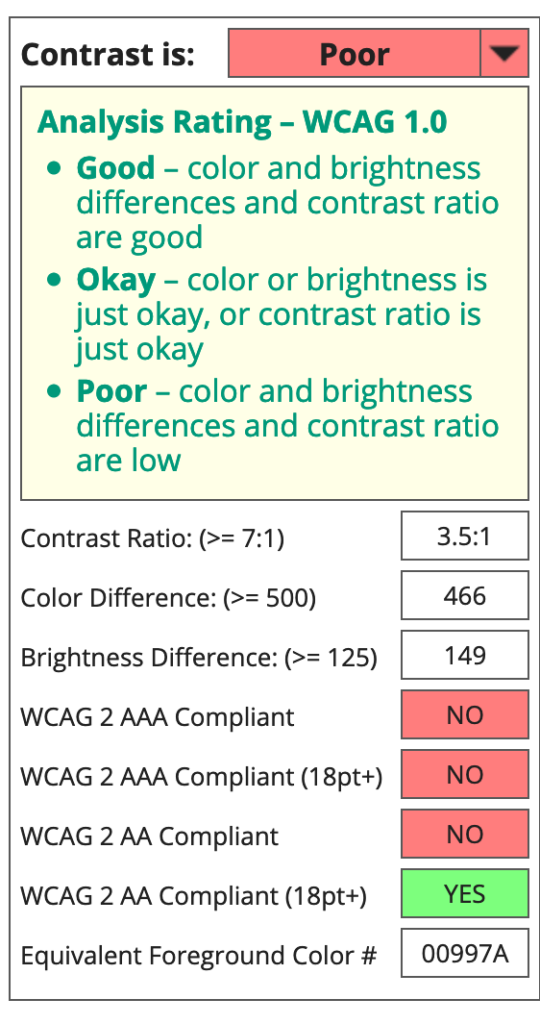
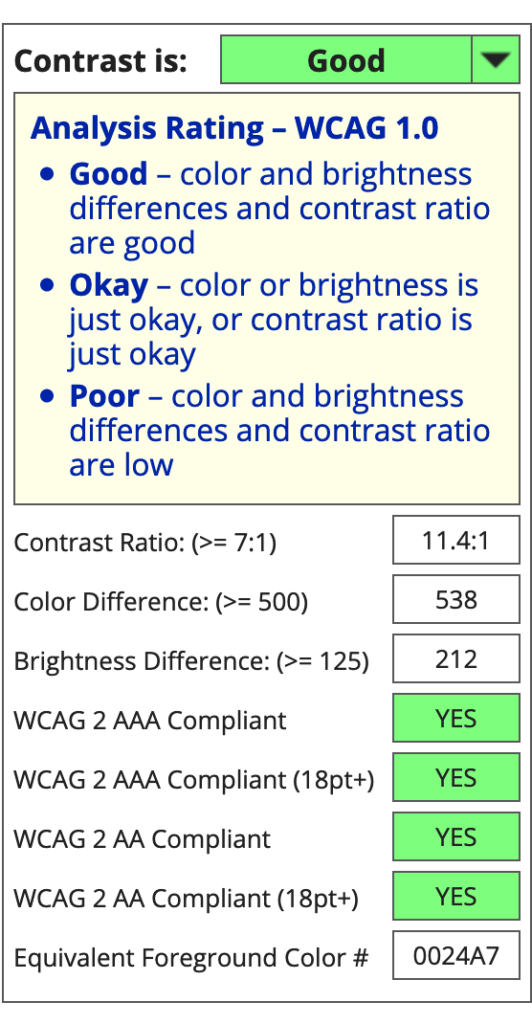
The effective use of colour in your video can draw your learners’ attention, emphasize key points and add aesthetic interest to your video. However, your choice of colours should be considered with accessibility in mind. The web accessibility guidelines instruct us to avoid relying on colour to convey meaning. Another critical component is colour contrast. By using low contrast colour combinations, it can create a barrier for some people. Colour contrast compares the brightest colour to the darkest colour in an image and expressed in a ratio, where a high ratio indicates a higher contrast.
To verify that the foreground text and background colour of your presentation slides have adequate contrast, try using a colour contrast checker or You can enter the RBG or HEX values for the colour and verify whether they meet requirements. Examples:
Colour Blindness
Another consideration is colour blindness, which affects 5-10% of the population in its various forms. Red-green deficiencies are the most common, so avoid using this combination in any non-decorative content. Blue-yellow deficiency is also common.

Describing Video
The visual imagery of video carries a lot of information but is not, unfortunately, accessible to all. While you don’t have to narrate everything that’s happening on the screen, you should at least:
- describe any images that are meant to convey content (i.e. those that are not decorative),
- reference aloud any important information that is on the slide or in the presentation.
If you catch yourself saying “as you can see from the slide…,” then it’s probably something that you’ll need to describe for students who are blind or have low vision.
Figures, videos, animations – consider how you will represent them in the video’s script if they are important to your students’ learning.
Copyright Considerations and Video
Copyright is another key component to planning your video if you intend to incorporate any media assets that you haven’t created yourself; media assets protected under copyright might include images, videos or audio.
Since removing content from a video that you’ve already published can be difficult and time consuming, it’s a good idea to verify that you either have permission to use content under copyright or that your use falls under a copyright exception before you create it.
We will preface what follows with the usual caveat that we are not providing legal advice. As the creator of the video, it will be your responsibility to evaluate whether your use of other people’s works complies with Canadian copyright law – but you can seek advice from the University’s Office of Legal Services by visiting https://copyright.mcmaster.ca/ or contacting them at copyright@mcmaster.ca.
Using Content Under Copyright in Your Video
Copyright is automatically applied to a work when it is created, most of what you encounter on the Internet will be protected by it – even if it seems like it’s freely available or there is no copyright symbol visible. That is, the Internet ≠ the Public Domain.
However, copyright law also seeks to balance the rights of the copyright owner with the rights of people who want to use works protected by copyright. There are multiple options available if you wish to incorporate copyright-protected works into your video.
The most common copyright exception that Canadian educators make use of in their teaching is Fair Dealing, which allows the user to copy a work for the purposes of education, research, private study, parody or satire. In addition to the use falling under an allowable purpose, the use itself must also be fair (refer to University’s Fair Dealing Policy, Appendix #1, section D).
The copy must be a short excerpt from a copyright-protected work – generally, up to 10% of the original work. Examples of what constitutes 10% of a work or another permissible amount can be found in the University’s Fair Dealing Policy, guideline 4.
While Fair Dealing is an available option for consideration, the two other exceptions below may be more applicable to the context of using copyright-protected works in a video you create if, for example, you wanted to use an entire work (such as an image that is not part of a copyright-protected work containing other images) or make your video available outside of a learning management system.
To determine whether your use of a copyright-protected work in a video would fall under Fair Dealing, contact copyright@mcmaster.ca.
Revisions to Canadian copyright law through the Copyright Modernization Act of 2012 introduced new exceptions to reflect the shifting norms set in motion by the ubiquity of networked, digital technologies. One was the “Work Available Through the Internet” section (30.04) of the Educational Institutions exceptions.
The exception can only be used by an educational institution or a person acting under the authority of one (i.e. you) and must meet a number of conditions, including mentioning the source of the work, not breaking a digital lock to copy it and using a copy that was made available over the Internet with the creator’s consent. You can read more about the exception in the University’s Fair Dealing Policy, Appendix #1, section H.
To determine whether your use of a copyright-protected work in a video would fall under the Work Available Through the Internet exception, contact copyright@mcmaster.ca.
Lastly, a copyright exception that was intended for use cases like creating a video which incorporates copyright-protected works is the Non-commercial User-generated Content exception, sometimes referred to as the mashup or YouTube exception. The exception is not limited to educational purposes, allows for entire works to be used and does not require the new work to be accessed behind a learning management system.
The new work (i.e. the video you create) must:
- be used solely for non-commercial purposes;
- mention the source of the copyright-protected work;
- not use an infringing copy of the copyright-protected work;
- not have a substantial adverse effect on the existing copy of the work, financial or otherwise.
The Non-commercial User-generated Content exception is not referenced in the University’s Fair Dealing Policy, so it is advisable to speak with the University’s Office of Legal Services for further guidance. To determine whether your use of a copyright-protected work in a video would fall under the Non-commercial User-generated Content exception, contact copyright@mcmaster.ca.
Leverage Creative Commons Content
Creative Commons (CC) content is a great alternative to using media assets with all rights reserved (i.e. marked with the © symbol). Creative Commons content is still protected by copyright, but the authors have given permission in advance for anyone to use their works according to the terms of the license.
Though using Creative Commons-licensed takes much of the uncertainty of using other people’s copyright-protected works, it is still important to follow the terms of the license. You can find out more about these terms in the “Finding Creative Commons-licensed content for your videos” resource.
If your use does not fall under a copyright exception and you cannot find a Creative Commons-licensed equivalent, you can always ask permission to use it from the copyright owner. The permission should be received in writing and cover your intended use of the copyrighted work. Contact copyright@mcmaster.ca to assist with requesting permission.
Safer than relying on copyright exceptions, you can incorporate content in your video that you already have permission to use. Sure, sometimes you need that exact image or audio track or video clip for teaching purposes – but if you’re simply looking for a generic picture of a dog riding a skateboard, Creative Commons-licensed content is the way to go! Creative Commons-licensed materials are copyrighted works that the owner has given permission in advance for anyone to use, meaning that you don’t have to ask them directly – provided you follow the terms of the license. The video below provides more information about Creative Comons licenses.
Creative Commons licenses are standardized agreements. They come in several “flavours” with respect to the terms of the license. You must follow the terms of the license to use the image, so be sure to pay attention to its terms. Most Creative Commons licenses have Attribution as a basic requirement.
Terms are often combined in a license, and some combinations are more restrictive than others. Works might be marked directly with the Creative Commons symbol, or a website might generally indicate that all of its content is licensed under Creative Commons.
You can read more about Creative Commons licenses on the Creative Commons website.
Sources of Creative Commons-licensed materials
You can find images and other content licensed under a Creative Commons license through a Google search. From Google’s image search interface, select the ‘Tools’ button to display additional drop-down menu options. Choose ‘Creative Commons licenses’ from the ‘License’ drop-down menu.
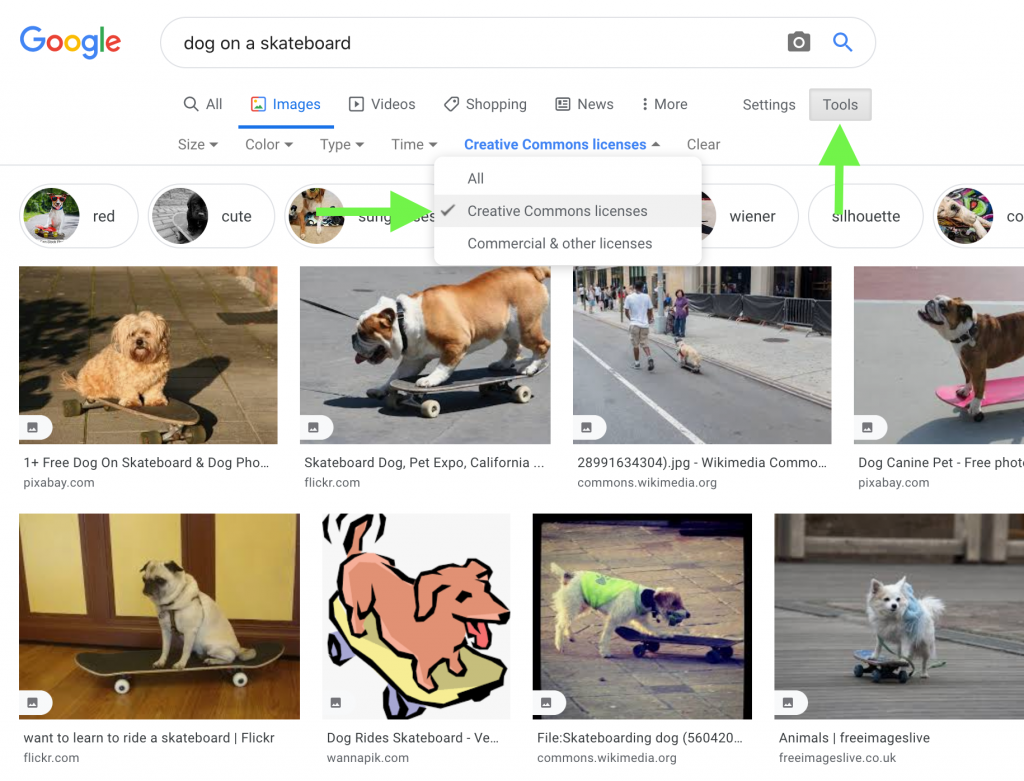
It’s a general filter for Creative Commons licenses, so visit the source of the image to verify the terms of the license before saving or copying the image (you may need the source to be able to attribute the image, anyway).
Note that content which does not have a Creative Commons license can occasionally be returned by mistake, so make sure to do this second step of visiting the image source to confirm! The license terms should be fairly easy to find; if they aren’t, assume the work is “all rights reserved” and move on..
When searching for images to use in your video, keep the following in mind:
- Find images that have a simple background and simple colours for the greatest visual impact
- Download the largest size and/or highest resolution image available, if you have a choice
- Record information about the images you use in a spreadsheet (or in an image manager like digiKam)
- the source URL for the image
- the image’s filename
- the author’s name (for attribution purposes)
- the terms of use, e.g. CC BY-NC or © (meaning that you’ll have to rely on a copyright exception)
- any other relevant details
Creative Commons content aggregators
Since it can be difficult to tell whether or not materials are available under a Creative Commons license “in the wild,” you may prefer to go directly to sites that aggregate Creative Commons-licensed content:
- Creative Commons
- Wikimedia Commons
- Flickr (not all content is CC, but allows you to limit your search by license)
- Pixabay (content is not Creative Commons-licensed per se but is licensed permissively)
Creating Quality Video
Video usage grew 24% in 2022, now equating to 65% of all internet traffic. (Source)
Video is increasingly a part of our everyday lives, both in and out of the classroom. Understanding three basic components and using simple tools and techniques we can quickly learn how to create great videos for an engaging learning experience. Creating great videos is easy if we have a good understanding of three basic principles:
- Light
- Quality
- Editing
While you may have reservations about creating videos in your class, understanding these three components will allow you to create great videos quickly and easily.
1) Light
The amount of light, or absence of it, greatly impacts your video. Just like our eyes, the camera needs light to see, or record, the image. But the camera needs more light to create a quality image that replicates what our eyes can see. This section explains how to use light effectively to get great results when making video.
Light is easily one of the most important factors for creating great video. While this could be a course unto itself, for our purpose we need to know that we need as much light as possible. There are a number of ways you can increase the light available for your camera – you can record outside and use daylight, position yourself near a window, or add an external light source – like a lamp or spotlight.
In this image, you see a comparison of how the computer camera and an external webcam interpret light. The images on the bottom have an external light source that greatly improve the quality of the image.
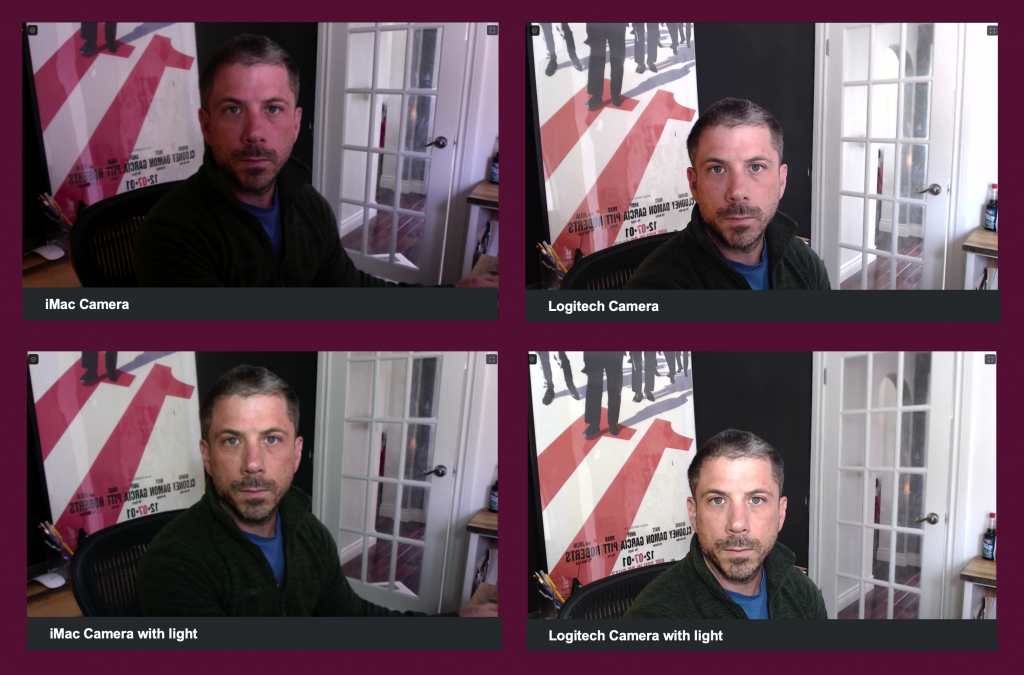
Take note of how the light hits the facial features and the resulting effect on clarity. You don’t want the light to be too harsh. You also want to avoid light on either side of the face. This creates shadows and an unflattering effects. Place the light directly in front of your face for best results. Or, face the window to take advantage of flattering, soft light.
Pro tip: While most built-in cameras are great, adding an external webcam or DSLR can greatly increase the quality of your videos. The camera used above is the Logitech 922 ProStream.
Everyone has taken a picture that is too dark or bright – that is exposure – how much light is used by the camera to translate the image. Not enough light and the image/video is dark. Too much and it is too bright. You can control exposure in a few ways.
- Control the distance to the camera. Too bright? Move the camera away from the light source and vice versa.
- Add a Filter. You can filter the amount of light by putting something between the camera and the lights source. This can be as easy as a piece of paper over a light to help diffuse the amount of light.
- Use exposure lock. Most phones give you the ability to “lock” the exposure. This stops the camera from trying to measure the amount of light at a default setting that you choose.
Adding funky filters for cool effects can be awesome on social media. But for professional purposes we want our videos to be high quality. And we want to look our best! Adding lots of light and making sure it is soft will get us most of the way there. But one other factor is that light has colour. As you can see in the image below, light ranges from warm yellow/orange to a cool blue.

Typically, indoors we want to replicate the daylight spectrum for best effects and avoid our faces or room looking orange. You can accomplish this by using lightbulbs with a Kalvin rating of 4-5000K. This will give you great results. Avoid fluorescent bulbs if you can – they tend to flicker and the camera may pick this up and cause a distracting strobe effect.
2) Quality
Quality is a tricky word. Everyone has a different idea of what quality is. You can spend may hours perfecting your videos to make them great. You can get fancy with amazing effects and animations. While those things may increase engagement, they do require a time investment. When we are creating video for learning we want to have the basics be great quality so they are not distracting from the learning experience. To achieve this, we create video with four components: great audio, great lighting, great composition and great technique.
Many people consider video quality in connection to technical specifications. When you use a phone or computer camera the machine does most of the work. This module gives you ways to improve that quality without having to worry or think about the technical aspect. In this section quality is not connected to effectiveness.
As we learned earlier in this module, great audio is a key component. Following the tips and principles that our audio should avoid background noise, be free from distraction, clear and loud, capture attention and avoid errors. If required, review the module on how to create great audio.
Great Composition
Composition refers to how we arrange, or frame, the image in the camera. You get to play director here! There are some basic rules we can follow that will greatly improve the quality of our videos.
Follow the Rule of Thirds
The rule of thirds is a concept that is used in art, film and photography that drastically impacts how your image/video is received. As you can see in the image below, the image is divided into thirds horizontally and vertically. Placing the subject (yourself) dead centre creates tension for the viewer. As you can see below, the subject is off to one side, we follow the gaze and angle of the arm and leg. And the space to the right is great for additional text!
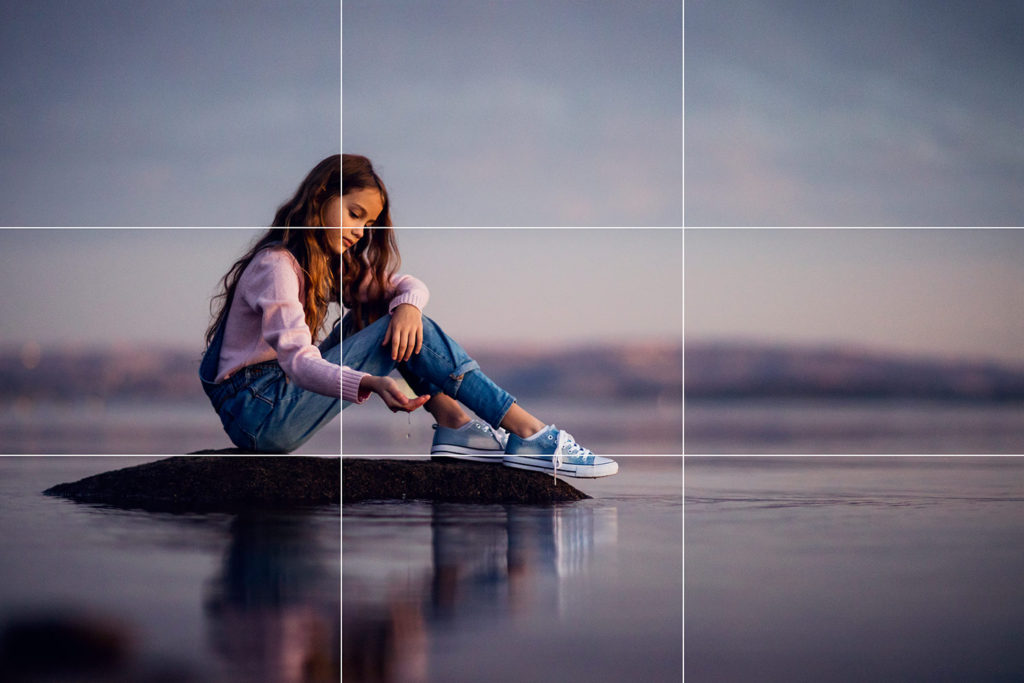
If you dig through your setting on your phone there is an option to turn this grid on/off. Use the rule of thirds to your advantage.
Framing
Where you place yourself/subject on the grid in rule of thirds will improve the quality of your video. How much of the frame also impacts the experience. You want to avoid being too large in the frame. Too close is too personal and the viewer will pay closer attention to your facial features instead of the message.

This image illustrates this concept and provides a good solution – but you can see how being centred causes your eye to wander around the frame – and there is no extra space for complimentary text or graphics.

Good Technique
Use a tripod
A shaky video is immediately distracting. And hard to watch. Unless you are making a horror film, we want the camera to be still. Let the subject be the movement. To achieve this – use a tripod. You can usually purchase a tripod for your phone for a few dollars. Or prop the phone up so it is still – then hit record.
Simplify the background
If you can, you want to control the background of your video. You want the background to complement your message. You also want the background to be simple and, like audio, avoid distractions. Things like books or interesting objects will pique interest and distract from learning. If they can, learners will try and read what is in the background. Also try to avoid personal items or settings.
If you can, get some distance from the camera and the background. This will somewhat blur the background and keep the focus on you – or the subject – which is what we want learners to do.
Look into the camera
It seems weird at first, but if you can, stare directly at the camera. As viewers we naturally follow the path of the eyes. We try to make a connection with the presenter. When you stare directly into the camera it is like you are looking someone in the eyes. You are speaking directly to them. If it helps, try to think about a specific person while you are recording – say a friend, parent, colleague… If your are speaking directly to them it will be reflected in the video and be more personal.
3) Editing
They say editing is where the magic happens. Much of the time you may be able to create a great video without needing to edit it. However, sometimes you may need to remove mistakes, background noise, or add embellishments. For our purposes we will focus on simple editing techniques that will allow you to remove mistakes, decrease/increase the volume, and add images. With a little exploration you can discover many more tips and tricks to make great videos.
This section uses Camtasia to illustrate the required techniques but the principles are similar for many video editing tools. Camtasia is a supported tool that is easy to use for recording audio and video but you should use the tools that work for you. You can view the selection of tutorial videos on the Techsmith Website.
Pro tip: Creating video can be taxing on the computer system. Make sure you have enough room on your hard drive and memory for it to work well. These are the requirements for using Camtasia.
If you made your video/audio recording on your phone/tablet it may easiest to edit on the same device. But if you would rather work on a computer the first step is to import it into Camtasia. The process is the same if you are doing audio only.
- To import your media, click the green Import media button.
- Then locate your media.
- Camtasia will put the files in your “bin” and put them on the timeline. The timeline is where you will edit the video.
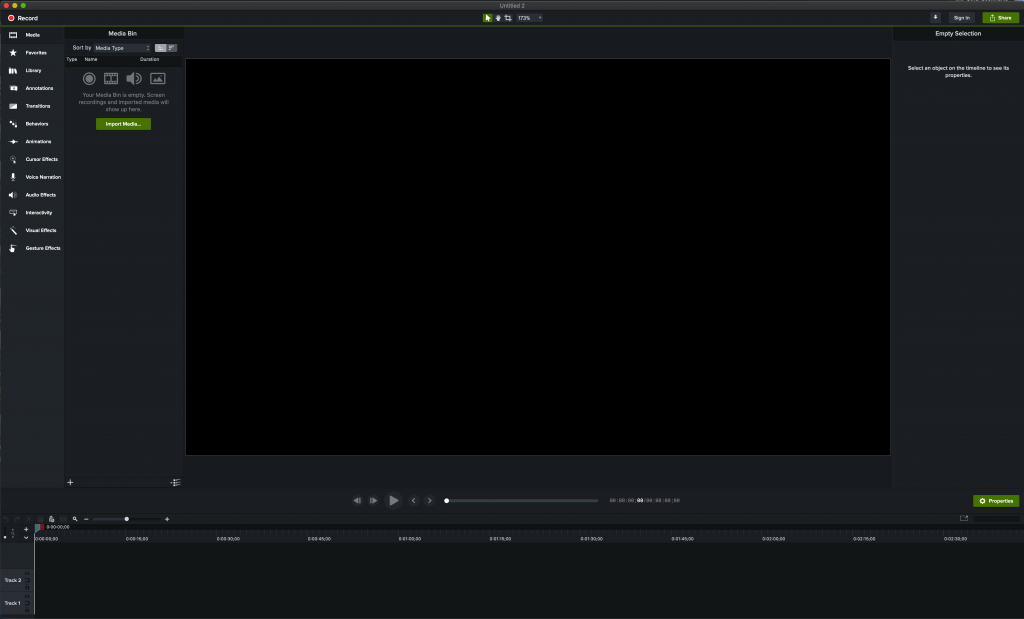
Once you have imported your media you can begin the editing process. The most common edit is to delete a section of the video to remove a mistake. The following video illustrates the common edits used to remove content.
Editing Audio:
Even if you follow the information presented in Creating great audio, sometimes you will have to edit it. You can take out dead air, fix mistakes, increase the volume, etc. This video shows you the basics of editing audio.
Exporting Media:
Once you have all of the editing completed you will be ready to export your media and share with students. To do this, follow the steps outlined in this video:
Share your media:
Once you have exported your video you can then publish your file to be shared with students. You have many options to choose from including MacVideo, Echo360, Microsoft Stream and others. We recommend MacVideo for this type of video which easily embeds in Avenue courses like this one. MacVideo also does automatic captions.
Once you have exported your video you can then publish your file to be shared with students. You have many options to choose from including MacVideo, Echo360, Microsoft Stream and others. We recommend MacVideo for this type of video which easily embeds in Avenue courses like this one. MacVideo also does automatic captions.
Media Creation Skills: Video Made Easy Module Summary
In a few short lessons you have learned the crucial elements required to create great audio and video, how to edit them and the different ways you can utilize video in teaching.
While video can be a great tool to increase learner engagement and pique interest, it is not the only way. Video is great for sharing information quickly, storytelling and demonstrating concepts or techniques. However, sometimes you can convey the same information in text or another medium. There are many tools at your disposal. Choose the ones that will work for you and improve the learning experience – and have fun!
Learn more about our digital production studios and how you can use them to produce high quality video and audio.
Information Box Group
Module Reflection Form Microsoft Form
Congratulations on completing a module in the MacPherson Institute Learning Catalogue!
We hope you found the experience meaningful and relevant to your teaching and learning practice. As part of our ongoing effort to improve and grow the Learning Catalogue, we invite you to take just a few minutes to complete a short reflection form.
We know your time is valuable, and we deeply appreciate your willingness to share your thoughts.

